
I didn’t really realize “cinnamon buns” was one of my “thangs” until when at the bank today doing a wire, I was sharing my cinnamon bun recipe with Jamie, the bank employee doing the wire for me. I mentioned how I had my “freezer” buns ready for a quick breakfast treat – these are much better, and better for you, than what you could get in the fridge section of the grocery store or in the bakery section. Jamie gave me her card and asked me to send her the recipe. So here it is…..
The first difference with my cinnamon buns is I use organic ingredients. It’s not just a feel good gimmick – for me it’s an absolute health necessity. If you have any health issues at all (or just want to prevent health issues), using only organic ingredients to make baked goods makes it easier to get and stay healthy.
Conventional wheat and sugar products in the US have a gut destroying glyphosate in them (Glyphosate residues in wheat and other crops are likely increasing recently due to the growing practice of crop desiccation just prior to the harvest). Follow the link to read the research on how bad it is to ingest Glyphosate (more commonly known as Monsanto’s Round Up). According to this government backed research study – it could be at the root of much of our common health and aging issues, uniquely prevalent in the US, but not in other countries. It’s also why many people when they visit Europe report back they had no problem eating bread in Europe, but in the US they get stomach aches from bread products made from conventional wheat and sugar.
Enough of my “use organic to stay healthy soapbox” – here is my healthy take on Cinnamon Buns (there are links in here to products I use that are affiliate links on Amazon – I do this to make it easy to find what you need to make these, and to show you what they look like as you can get many of these at most grocery stores).
Please make sure to read the recipe before starting to ensure you have everything you need to produce a great outcome.
Time Estimate – this is a fun project I usually do on Saturdays as it takes a little bit of time here and there while waiting for the different rising times.
Prep – 15 minutes
Make Dough – 20 minutes
Make Rolls – 30 minutes
Frost Rolls – 15 min
Prep Equipment (Nice to Have)
- Tins for Freezing Small Batches of Cinnamon Rolls (Optional – you can make them all at once and you can find these tins in most grocery stores)
- Rolling Pin (Optional – you can use a wine bottle and a clean counter)
- Large Stand Mixer (optional – knead dough by hand and get great results – I prefer the large pro version of the Kitchen Aid as the engines overheat and shut off on the smaller mixers when making bread)
- Incubator for bread rising (optional – you can create a warm moist incubation environment with a pot of boiling water in an unheated oven)
- Temperature Probe (no real option for this – it’s the only way to know if the cinnamon buns are done – most grocery stores have a low-cost digital temp probe)
- Magic Bullet (option – you can use a mixer or a blender – but this is really handy to have in the kitchen)
- Squeeze Bottle (option – you can use a spoon but this makes a much nicer display on the cinnamon bun with the frosting)
Ingredients (makes 8 tins of cinnamon buns or 48 buns – one tin serves 3-6 people for breakfast)
- 1 cup warm water (no more than 110 F)
- 1/2 cup organic sugar
- 2 packages fast rising yeast
- 1 cup organic whole milk
- 1/4 cup organic honey
- 1 cup organic, cultured butter (2 sticks) (use one stick for the bread)
- 2 large organic eggs
- 3- 4 cups of organic white bread flour
- 1/2 cup vital wheat gluten
- 1 1/2 cups sprouted organic spelt grain flour
- 1 tablespoon fine grain sea salt
- 1 tablespoon organic chia seeds
- 2 tablespoons organic cinnamon
- 8 ounces of organic soft spreadable cream cheese
- 1/4 cup of organic powdered sugar
- 1 tablespoon of half and half
Directions
- Proof the Yeast – mix the yeast in the warm water with 1 tablespoon of sugar (set the rest of the sugar asside – you need it for the cinnamon sugar swirl part of the cinnamon bun). When it starts to bubble, you know the yeast is working and is good to use for making your cinnamon buns.
- Put the milk, honey and 1 stick of the butter into a pan and heat and stir until the butter and honey are melted into the milk. Remove from heat and wait until the temp has dropped to where it’s the same temp as your skin.
- Mix the eggs into the cooled milk mixture. Mix with a whisk or a fork until it’s all mixed together and there are no more stray egg parts.
- Mix 3 cups of the organic white flour, vital wheat gluten, sprouted spelt flour, salt and chia seeds.
- Add the proofed yeast, milk, honey, butter and egg mixture into the flour mixture.
- Mix to thoroughly combine all the ingredients – either by hand or with the dough hook on the kitchen aid mixer.
- Knead the dough by hand or with the mixer for about ten minutes – adding more flour a tablespoon at a time to keep the dough from being too sticky – it should be soft but not sticking in big globs on your hands.
- Raise the dough.
- Get a glass, ceramic or plastic bowl big enough for the dough to double in size. Coat the bowl in melted unflavored coconut oil, or butter. Put the dough in the bowl and make sure to get the oil all over the dough (this helps the dough rise better by preventing the rising dough from sticking to the side of the bowl).
- Cover the bowl with saran wrap.
- Find a warm environment for the bowl (around 85-95 degrees) – the incubator is great for this. Or boil two quarts of water in a pan, and put it and the bowl with the bread in an unheated oven.
- Let the dough rise until it is double in size (takes 1 to 3 hours)
- Split the dough into four sections. Mix the two tablespoons of cinnamon with the remaining sugar (1 tablespoon less than 1/2 cup). Make sure the last stick of butter is soft.
- Make one section at a time.
- For each section, roll out to about 1/4 inch thick on a floured surface so the dough does not stick.
- Spread 1/4 of the butter evenly over each section of rolled out dough.
- Sprinkle 1/4 of the cinnamon/sugar mixture evenly over dough (about two tablespoons).
- Roll up tightly like a jelly roll – the roll should be about 1 foot long.
- Cut the roll into 12 equal sections.
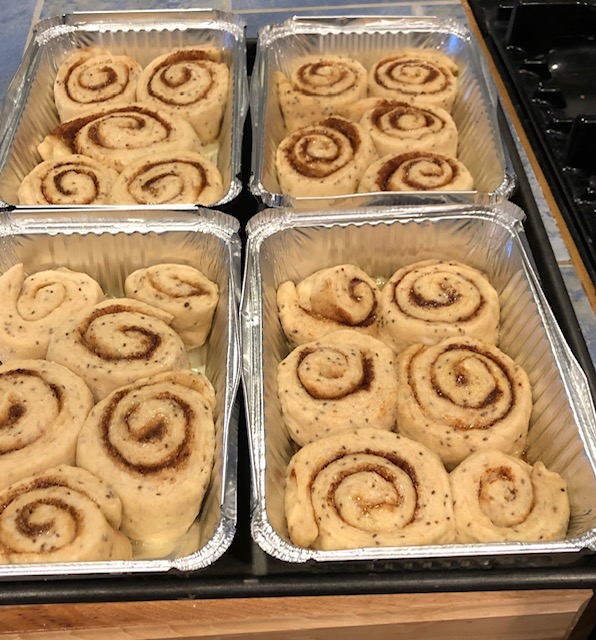
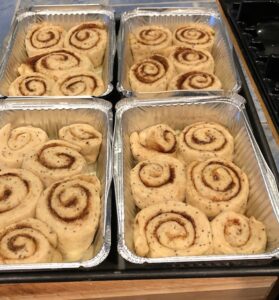
- Grease two tins and place six cinnamon buns in each tin. Leave plenty of room between the cinnamon buns to rise again.
- Repeat for the other three sections of dough.
- Let the dough come to a second rising in your incubator or unheated oven – this usually takes 30 to 60 minutes.
- Cook the cinnamon buns.
- Pre-heat the oven to 350 F
- Cook for 10 – 15 minutes or until the cinnamon buns are done (200 F internal temperature – I always test this as it’s the only way to really know if they are done).
- Let cinnamon buns cool in their tins.
- Make the frosting – mix the cream cheese, powdered sugar and half and half (I use a magic bullet). I put it in a squeeze bottle and drizzle over the cooled cinnamon rolls.
- The tins come with covers – cover the cinnamon buns you are going to freeze. Make sure you label them as Cinnamon Buns and the date you made them.
- To reheat the cinnamon buns – take out of the freezer the night before and let sit on the counter or take out the day before and let sit in the refrigerator. Either reheat in the oven at 350 F for 5 – 10 minutes or microwave for 30 seconds per cinnamon bun.