

I got inspired to make Focaccia bread watching Samin Nosrat’s Salt, Fat, Acid, Heat Netflix series.
The challenge – using the milled Sprouted Hard Red Winter Wheat Flour as whole grain milled flours often create very dense breads.
My first attempt was a fail. I had tried too many extra elements of a variety of Focaccia recipes. So this attempt, I dialed it back and made half the recipe because who wants to throw away a lot of a failed journey. Keeping it basic, I followed the brining technique Samin shows in the Netflix series and relied on experience making bread with sprouted grain flours.
This attempt generated a light, chewy crumb and the classic crispy crust. But, it stuck to the pan – I did not use enough olive oil. The brine is salty so in the recipe below, I dialed back the amount of salt put into the dough.
Time Estimate
Making bread is not all that time consuming, but it takes a lot of time. I started making the dough at 3 PM and the focaccia was ready by 7 PM. Overall it was less than 20 minutes of effort. Based on the other Focaccia recipes where the dough rises overnight in the refrigerator – this is remarkably fast for making focaccia.
Prep Equipment (Nice to Have)
Flour Mill – Once the wheat berries have sprouted and been dehydrated, they need to be milled into flour. You can get manual hand crank mills. I prefer the electric version as it’s faster and less work.
Kitchen Aid Mixer – you can make bread without a kitchen aid mixer. I like using the mixer as it helps to knead the bread while I attend to other tasks in the kitchen. Sometimes if you have too much dough in the bowl, or the dough is very heavy, the kitchen aid motor can overheat. If this happens, finish kneading the dough by hand.
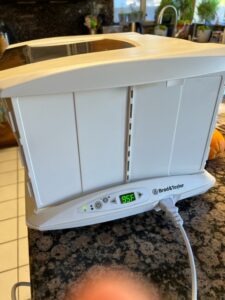
Bread Proofer – Prior to getting a dedicated bread proofer, I would put the dough in the oiled rising bowl into a cold oven with a pan of recently boiled water. The intent was to create a warm, moist environment for the dough to rise. With the bread proofer, the dough rises more in less time.
Ingredients
1 package of fast rising yeast
1 cup of luck warm water
1 tsp honey
1 cup milled sprouted hard red winter wheat berries
1/3 cup vital wheat gluten (this ingredient helps breads made with sprouted grains rise better and faster).
1/2, plus 2 tbs organic white bread flour
1/4th tsp powdered ginger (helps make a softer crumb)
1 tsp kosher salt
2 tbs olive oil
Brine – 3 tbs warm water, 1 tsp salt
2 tbs olive oil for oiling the bowl and the pan it’s cooking in.
Directions
- In the bowl where you are making the dough, dissolve the yeast and honey in the lukewarm water. Let it sit for 5 minutes and make sure the water, yeast and honey is bubbly – this is called “proofing” the yeast.
- Add in all the other ingredients, except two tablespoons of the white flour. Using the dough hook, start the mixer on low speed.
- After several minutes, the dough should be pulling away from the sides of the bowl. If it’s sticking to the side of the bowl, add in more organic white flour, one tablespoon at a time until the dough is no longer sticking to the sides.
- This dough is supposed to be wet and sticky, but it has to be able to form into a ball.
- Because the dough is soft, wet and sticky, you don’t knead it too long. After about five minutes mixing on low, the dough is ready to proof (rise).
- Oil the proofing bowl – In a glass or hard plastic bowl, at least 3 x as big as the dough ball, coat the inside of the bowl with two tablespoons of olive oil.
- Move the dough ball from the mixing bowl to the proofing bowl – roll it around in the olive oil covering the whole dough ball in olive oil. Cover the proofing ball with saran wrap.
- Place the proofing bowl it into a 95 degree F bread proofing box.
- When the dough ball has risen to twice it’s size (after about 90 minutes), peel the dough off the sides and fold it over into the middle forming it into a dough ball again.
- Prep a glass pan (6×9) with the last two tbs of olive oil – covering all sides and the bottom.
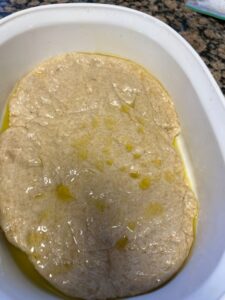
The focaccia dough in it’s second rising - Spread the dough ball into the prepped glass pan. Press it to the sides.
- Cover the glass pan with saran wrap and put back in the proofing box until the bread has risen to twice its height (about 60 minutes).
- Remove from the proofing box and punch down the dough by pressing your fingers into the dough (it will leave deep indentations in the dough)
- Dissolve the last 1 tsp of salt into the 3 tbs warm water.
- Pour the water over the dough in the pan.
- Cover the glass pan with saran wrap and put back into the proofing box at 95 degrees F for 45 min.
- Pre-heat the oven to 450 Degrees F
- Sprinkle a pinch of large flaked salt over the top of the focaccia.
- Put in the oven, and turn down the heat to 400 Degrees F
- Bake for 20 minutes – check with temp probe – if it’s at 200 degrees, Focaccia is done.
Cooling
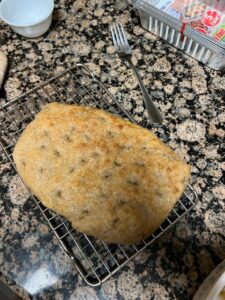
- Take out of pan and put on cooling rack.
- It’s ready to eat in about 15 minutes.
Serving Suggestions
- Slice into 1 inch thick wide sections.
- Enjoy plan or dip into olive oil with balsamic, pesto, or with cheese, sliced meats, or roasted garlic.
- It stays fresh for about a day. If you don’t consume it within a day store the rest of the slices in the freezer.